Are you an aspiring mushroom grower looking for an effective way to grow your favourite fungi? Look no further!
In this blog post, I'll provide you with a comprehensive guide on how to build a Martha grow tent, a medium-sized grow chamber designed to provide the perfect environment for fruiting mushrooms.
Get ready to embark on an exciting journey towards mastering mushroom cultivation with your very own Martha grow tent.
Short summary
-
Martha grow tents provide a tailored environment for mushroom growth with features like humidity and CO2 controls.
-
Essential components include a 4-tier greenhouse, humidifier, humidity controller, fresh-air exchange fan, and more.
-
Troubleshooting issues usually involves adjusting humidity, fresh air exchange, or temperature levels.
Understanding the Martha grow tent concept
A Martha grow tent, often referred to as a Martha fruiting chamber, is an adaptable, controlled environment built specifically to fruit a variety of mushroom species.
Its highly customizable nature allows it to fit any budget or space constraints, making it a go-to choice for mushroom enthusiasts at all levels of experience.
The core of the Martha tent concept lies in providing the ideal conditions for mushroom cultivation, such as optimal humidity, fresh air exchange, and temperature.

By meeting these requirements, a Martha grow tent guarantees a flourishing habitat for your mushrooms.
Martha grow tents are particularly effective for cultivating edible or medicinal mushrooms in a variety of mediums, such as blocks, trays, or buckets.
For those keen on setting up their own mushroom cultivation system, understanding the mechanics of building a Martha tent can be an invaluable skill.
Essential components for a successful Martha grow tent
To build a successful Martha Grow Tent, you will need a set of essential components.
These components work in harmony to create the perfect environment for your mushrooms to thrive.
The key components include a 4-tier greenhouse, humidifier, humidity controller, fresh-air exchange fan, a filter and clamp, and a drip tray.
Each of these components plays a vital role in maintaining the ideal conditions for mushroom growth, ensuring your Martha tent will yield a bountiful harvest.
Optional components include a CO2 controller and a window kit.
4-tier greenhouse
At the heart of a Martha tent is the 4-tier greenhouse.
This greenhouse will hold all of the following components, providing the space in which your mushrooms will grow.

Ultrasonic humidifier
The ultrasonic humidifier creates a fine mist that boosts the humidity within the tent.
Maintaining a suitable level of humidity is crucial for mushrooms as they require a lot of moisture to thrive.

Humidity controller
To maintain the right level of humidity, you can use a handy device called a humidity controller.
This device connects to your humidifier, automatically turning the humidifier on and off based on the values you set.

For instance, you could set the minimum humidity level to 80% and the maximum to 90%.
The controller will then activate the humidifier whenever the humidity drops below 80 and turn it off when it exceeds 90.
This level of control is crucial for successful mushroom cultivation, as it ensures that the environment within the tent remains optimal for mushroom growth.
Fresh-air exchange fan
The fresh-air exchange fan plays a crucial role in a Martha grow tent by helping to pull fresh air into the tent and expelling stale air and CO2 out.
A lack of fresh air inside your tent means elevated CO2 levels and hampered mushroom growth.

Filter and clamp
Attaching a filter to the intake part of the fan will prevent it from getting clogged with mushroom spores.

Drip tray
The drip tray catches any excess water that may drip from the tent, protecting your floors and ensuring that the area around the tent remains clean and dry.

CO2 controller (optional)
For those who want to take their setup to the next level, a CO2 controller is a great addition.
Similar to the humidity controller, the CO2 controller turns the fan on or off based on the CO2 levels you set.

While it's a bit pricey and not strictly necessary, it's a useful tool if you can afford it.
It provides an additional level of control over the environment within the tent, ensuring that the CO2 levels remain optimal for mushroom growth.
Window kit (optional)
Lastly, we have a window kit to exhaust the tent out of a window.
This helps to improve air exchange and makes it easier to maintain lower CO2 levels.
If you don't have a window, don't worry; you can still set up a successful Martha tent.

Step-by-step guide to building your Martha grow tent
Now that you have a solid understanding of the essential components required for a successful Martha grow tent, it's time to put your knowledge into practice.
In this section, I'll provide a step-by-step guide to building your very own Martha grow tent, including assembling the tent frame, installing the humidifier and humidity controller, installing the fan and CO2 controller, and exhausting the tent.
By following these steps, you will be well on your way to creating a thriving environment for your mushrooms to grow.
Regular observation of the environment will help you fine-tune the conditions and ensure the best possible outcome for your mushroom cultivation endeavors.
Assembling the greenhouse frame
Start by assembling your tent frame per the instructions but with one key modification.
Given that the fan has to be situated at the tent's peak, you'll need to install bars and a shelf at the topmost tier.
This setup is atypical for a 4-tier greenhouse but essential for your needs.
For this modification, take the bars and shelf from either the first or second tier and install them on the top tier.


If you relocate the second tier bars and shelf to the top, you'll have two shelves left for growing mushrooms, with the advantage of a dedicated shelf for your humidifier.
Alternatively, if you move the bottom tier bars and shelf to the top, your humidifier can be stationed on the ground.
This leaves you with three shelves for growing mushrooms.
Having more shelves is beneficial if you want to grow as many mushrooms as possible.
In my experience, I typically grow just a handful of fruiting blocks at a time, so two shelves is fine.
And lastly, place the plastic cover over the frame.
Installing the drip tray
This step is pretty straightforward: place the tent on the drip tray.
Installing the humidifier and humidity controller
Place your humidifier (full of water) on the drip tray or the bottom shelf, depending on how you constructed your frame.
Then, hang the humidity sensor on the top the top shelf (putting it far away from the humidifier will help you get more accurate readings).

Plug the sensor into the humidity controller, then plug the humidifier into the controller.
Next, set the maximum and minimum values on the controller.
For growing most mushrooms, you can set the maximum humidity at 90% and the minimum at 80%.
Installing the fan and optional CO2 controller
Place the fan on the top tier, with the exhaust facing the back of the tent.
Next, you need to cut a hole in the plastic for the fan to exhaust.
The first step is tracing the circle of the fan exhaust with a marker (make sure the traced hole is slightly smaller than the actual hole, which will help provide a snug fit for your fan).

Then carefully cut the traced hole with scissors and pop the fan exhaust through the hole.
If you have a CO2 controller, you'll want to hang the CO2 sensor beside the humidity sensor.

Then plug the CO2 sensor into the controller, plug the fan into the controller, and set your minimum and maximum C02 values.
Every species of mushrooms have different C02 requirements, but I find a minimum of 400 ppm and a maximum of 450 ppm works great for most kinds.
Exhausting the tent
If you don't have a window to exhaust your tent from, then your Martha grow tent is ready to go.
Keep in mind that without a window exhaust, the CO2 level inside your tent might become higher than desired, even if your fan is on 24/7.
In that case, you'll want to keep a door or window open to bring in fresh air.

If you have a window to exhaust your tent out of, set up your window kit as per the instructions.
Connect the tube to the exhaust of the fan and secure it with some tape.
Of course, you don't need a A/C window kit to exhaust your tent.
If you're a DIY type, you can simply buy some tubing and wood/insulation and make your own window setup.
Light requirements
Contrary to what most people think, mushrooms need a bit of indirect sunlight to grow.
Indirect sunlight, in case you don't know, is light that reaches an object by bouncing off other surfaces instead of shining on it directly from the sun.
Make sure to place your tent in an area that receives at least a little bit of indirect light.
Temperature requirements
Most mushrooms thrive when the temperature is kept between 12-24 degrees Celsius (55-75 degrees Fahrenheit).
The key is to place your tent in an area of your home that stays between this temperature range.
If it goes above or below it, use an air conditioner or heater in the room accordingly.
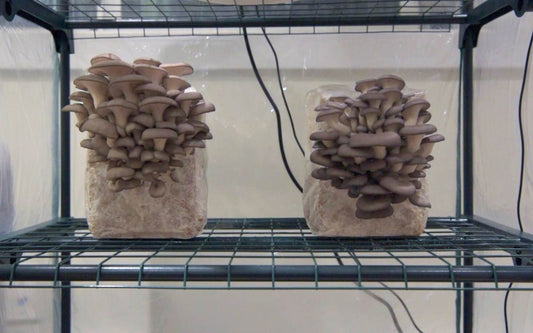
Growing mushrooms
Now that your tent is set up, you're ready to grow mushrooms!
Insert your colonized blocks, trays, or buckets onto the shelves in your tent.

Then turn on your humidifier, fan, and controllers.
In a few days to a few weeks, depending on the species, you'll soon have a bounty of fresh mushrooms to harvest!
Troubleshooting common issues in Martha grow tents
Despite your best efforts, you may encounter some common issues in your Martha grow tent.
In this section, I'll address these problems and provide troubleshooting tips to help you overcome them and ensure a successful mushroom cultivation experience.
By understanding the potential issues such as high CO2 levels, excessive moisture, and temperature fluctuations, you can make the necessary adjustments to your Martha grow tent setup and maintain the ideal conditions for optimal mushroom growth.
High CO2 Levels
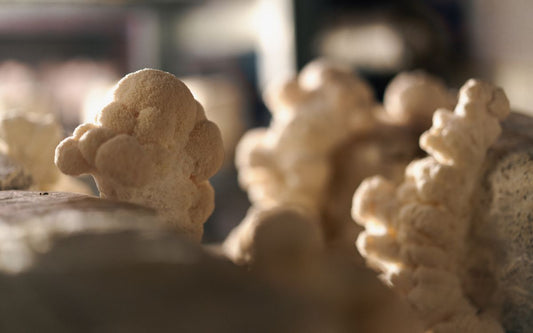
High CO2 levels in your Martha grow tent can manifest as stunted growth, lanky oyster stems, or a coral-like growth pattern in your lion's mane.

To address this issue, adjust the fan operation duration or, ideally, use a CO2 controller to maintain optimal CO2 concentrations for healthy mushroom growth.
By closely monitoring CO2 levels and making necessary adjustments, you can prevent tall stems, abnormal fruiting bodies, or coral-like growth patterns and ensure a successful grow.
Excessive moisture
Excessive moisture in your Martha grow tent can lead to a host of issues, such as poor mushroom development and fuzzy stems.
To address this issue, make sure your ventilation is adequate.
If you're not using a CO2 controller, this may mean manually turning your fan on more frequently.
Temperature fluctuations
Temperature fluctuations can significantly impact mushroom growth and result in issues such as pale fruiting bodies or inadequate growth.
If your temperature is dropping too low, use a heater in the room.
If the temperature is getting too high, consider using an air conditioner.
Conclusion
In conclusion, building a Martha grow tent provides the perfect environment for cultivating a variety of mushroom species.
By understanding the essential components, following the step-by-step guide, troubleshooting common issues, and implementing tips and tricks, you can ensure a successful and rewarding mushroom growing experience.

Frequently asked questions
What temperature should a Martha tent be?
Keep the tent in an area that stays between 12-24 degrees Celsius (55-75 degrees Fahrenheit).
How often do you vent a Martha tent?
The frequency of fan use in a Martha grow tent can vary based on your specific setup.
If you have a CO2 controller, it can manage the fan operation for you.
The controller will turn the fan on when CO2 levels rise above the ideal range, ensuring a healthy fresh air exchange without over-drying the environment.
Without a CO2 controller, manual fan operation or a timer system is necessary.
Turn the fan on for 15 minutes every hour, but remember to monitor the humidity closely.
Too much fan use can dry out your mushrooms, so adjustments may be needed based on your observations
Should the fan be at the top or bottom of the Martha tent?
You can place your fan at the bottom or top, but, in my experience, it's easiest to set it up at the top.
In larger growing tents, fans are typically placed at the bottom because that is where spores accumulate.
However, with a smaller tent like a Martha, it doesn't make much of a difference.
What is the ideal humidity level for a Martha grow tent?
Ideally, a Martha grow tent should be maintained at an average humidity of 85%, with 80% being the lower limit and 90% the upper limit.
Maintaining the right humidity level is essential for the health of your mushrooms.
Why is it called a Martha grow tent?
The "Martha Grow Tent" is named after Martha Stewart's line of storage units that were repurposed as mushroom growing chambers. These units provided the ideal environment for mushrooms, so any similar setup is often referred to as a "Martha."

Spenser Smith
I am passionate about mushrooms. My number one goal: help you grow mushrooms in your home!